传智播客day40-Spring
更新日期:
Spring 概念
Spring 是分层的 JavaSE/EE 一站式轻量框架
Java 体系结构分层: 客户端分层, web层, 业务层, 持久层
服务器三层架构: web层, 业务层, 持久层
- web层: Servlet + Jsp, Struts框架
- 持久化技术: JDBC 接, Hiberante框架
- 业务层技术: EJB(复杂), Spring 框架(取代EJB)
Spring 出现, 就是为了解决常见的JavaEE企业开发问题
- 一站式: Spring 框架提供了 web层(SpringMVC), 业务层 IoC, AOP, 和事务管理, 持久层JcbcTemplate,
IoC: 控制反转
AoP, 面向切面编程
Spring 框架优点
方便解耦,简化开发
Spring就是一个大工厂,可以将所有对象创建和依赖关系维护,交给Spring管理
AOP编程的支持
Spring提供面向切面编程,可以方便的实现对程序进行权限拦截、运行监控等功能
声明式事务的支持
只需要通过配置就可以完成对事务的管理,而无需手动编程
方便程序的测试
Spring对Junit4支持,可以通过注解方便的测试Spring程序
方便集成各种优秀框架
Spring不排斥各种优秀的开源框架,其内部提供了对各种优秀框架(如:Struts、Hibernate、MyBatis、Quartz等)的直接支持
降低JavaEE API的使用难度
Spring 对JavaEE开发中非常难用的一些API(JDBC、JavaMail、远程调用等),都提供了封装,使这些API应用难度大大降低
Spring体系结构
从Spring的规范文档中
- 核心技术 IoC 和 AOP , 测试
- 数据访问 (持久层解决方案), 事务管理, JDBCTemplate, 其他ORM框架整合
- Web层解决方案 SpringMVC
- 集成(WebService, JavaMail, JMS, 任务调度, 缓存)
IOC 和 DI 开发入门
- 下载依赖包和开发包, 最新版本是 4.1, 课程使用3.2
- 导入Jar包,
spring-beans,spring-context,spring-core,spring-expression,commons-logging,log4j
IOC: 控制反转, 解决程序对象紧密耦合问题(工厂 + 反射 + 配置文件), 将原来程序自己构造的权利, 交给 IoC容器来构造, 需要一个对象, 找IoC容器获取(对象的构造权被反转)
DI: 依赖注入, IoC需要为程序提供依赖对象, 返回这个对象所依赖的对象, 一同可以提供.
实现案例
1 2 3 4 5 6 7 8 9 10 11 12 13 14 15 16 17 18 19 20 21 22 23 24 25 26 27 28 29 30 31 32 33 34 35 36 37 38 39 40 41 42 43 44 45 46 47 48 49 50 51 52 53 54 55 56 | // web层 public class UserServlet { // 方式三, DI, 依赖注入, // (Spring 在构造 UserServlet 对象时, 同时提供它所依赖的对象) @BeanProperty private UserService userService; public void regist() { println("表现层, 添加用户"); // 方式一: 传统做法 UserService userService = new UserService(); // 方式二: IOC, 通过工厂 ApplicationContext applicationContext = new ClassPathXmlApplicationContext("applicationContext.xml"); UserService userServlet = applicationContext.getBean("userService"); userService.regist(); } } // 业务逻辑层接口 public interface UserService { void regist(); } public class UserServiceImpl implements UserService { @Override public void regist(){ println("业务层, 添加用户"); // 传统做法 UserDao userDao = new UserDao() userDao.saveUser(); } } // 持久层接口 public interface UserDao { void saveUser(); } public class UserDaoImpl implements UserDao { public void saveUser(){ println("持久层, 添加用户");} } // 测试案例 @Test public void testRegist(){ UserServlet us = new UserServlet(); us.regist(); } @Test public void testIoC(){ // 从Ioc 容器获得对象 // 1. 获取Ioc工厂, 每一次都会产生新的Spring工厂 ApplicationContext applicationContext = new ClassPathXmlApplicationContext("applicationContext.xml"); // 2. 从IoC的容器工厂, 获取需要对象(根据bean的id) UserServlet userServlet = applicationContext.getBean("userServlet"); } |
将所有对象交给IoC容器(Spring)来管理
通过 applicationContext 配置 Spring 管理对象
在程序中通过 ApplicationContext 接口获取工厂对象
- ClassPathXmlApplicationContext, 读取 src下的配置文件
- FileSystemXmlApplicationContext, 读取 WEB-INF 下的配置文件
DI是IoC的延伸
1 2 3 4 5 6 7 8 9 10 11 | <!-- applicationContext.xml --> <!-- 查找文档, 添加 xsd 约束文件 --> <beans> <bean id="userServlet" class="zhpooer.UserServlet"> <!-- name: 属性对应对象中 setXXX方法 --> <!-- ref: IoC引用bean的id --> <property name="userService" ref="userService"/> </bean> <bean id="userService" class="zhpooer.UserServiceImpl"/> <bean id="userDao" class="zhpooer.UserDaoImpl"/> </beans> |
Spring对象工厂
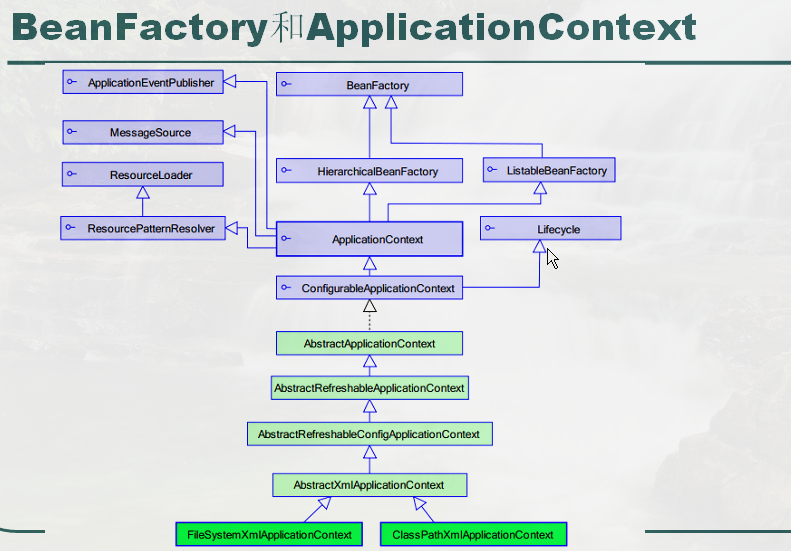 ApplicationContext 是 BeanFactory 的子接口, BeanFactory
才是 Spring 框架最核心接口.
ApplicationContext 是 BeanFactory 的子接口, BeanFactory
才是 Spring 框架最核心接口.
ApplicationContext 为提供了 BeanFactory 更多扩展, 企业不常用 BeanFactory
- 国际化处理
- 事件传递
- Bean自动装配
- 各种不同应用层的Context实现
ApplicationContext 在容器初始化时, 对其中管理Bean对象进行创建, Bean对象在获取对象时, 才进行Bean对象初始化
1 2 3 | BeanFactory beanFactory =
new XmlBeanFactory(new ClassPathResource("ApplicationContext.xml"));
beanFactory.getBean("userService");
|
IoC 容器装配 Bean
Spring 提供配置Bean 三种实例化方式
使用类构造器实例化(默认无参数)
1
<bean id="bean1" class="cn.itcast.spring.b_instance.Bean1"></bean>
使用静态工厂方法实例化(简单工厂模式)
1
2
3
4
5
6
7
// <bean id="bean2" class="cn.itcast.spring.b_instance.Bean2Factory"
//      factory-method="getBean2"></bean>
public class Bean2Factory {
    public static Bean2 getBean2(){
        return new Bean2();
    }
}
使用实例工厂方法实例化(工厂方法模式)
1
2
<bean id="bean3Factory" class="cn.itcast.spring.b_instance.Bean3Factory"></bean>
<bean id="bean3" factory-bean="bean3Factory" factory-method="getBean3"></bean>
应用场景, 大多数情况, 可以通过构造器实例化 , 如果构造过程很复杂, 可以用工厂实例化方式
Bean 作用域
<bean>元素scope属性
scope="singleton"单例 ,在Spring IoC容器中仅存在一个Bean实例(默认的scope)scope="prototype"多例 ,每次从容器中调用Bean时,都返回一个新的实例,即每次调用getBean()时 ,相当于执行new XxxBean()scope="request"用于web开发,将Bean放入request范围 ,request.setAttribute("xxx") , 在同一个request 获得同一个Beanscope="session"用于web开发,将Bean 放入Session范围,在同一个Session 获得同一个Beanscope="globalSession"一般用于Porlet应用环境 , 分布式系统存在全局session概念 ,如果不是porlet环境,globalSession 等同于Session
在开发中主要使用 scope="singleton"、 scope="prototype
Bean的生命周期
配置 Spring Bean 初始化和执行方法
1 2 | <!-- 初始化方法, 要无返回值, 和无参数 --> <bean init-method="setup" destory-method="teardown"></bean> |
- destroy-method 只对
scope="singleton"有效 - 销毁方法,必须关闭ApplicationContext对象,才会被调用
1
2
ClassPathXmlApplicationContext applicationContext = new ClassPathXmlApplicationContext("applicationContext.xml");
applicationContext.close();
后处理器
使用BeanPostProcessor 就是钩子函数,作用用来对Bean对象进行扩展, 可以实现动态代理, 是AOP的核心
1 2 3 4 5 6 7 8 9 10 11 12 13 | // 每一个对象创建都会执行 public class MyBeanPostProcessor implements BeanPostProcessor { // bean: Spring容器创建的 duix // beanName, 对象的ID public Object postProcessAfterInitialization(Object bean, String beanName){ // 后处理器, 执行后 return new Proxy().newProxyInstance(); } public Object postProcessBeforeInitialization(Object bean, String beanName){ // 后处理器,执行前 } } //<bean class="MyBeanPostProcessor"></bean>, 不需要写id |
Bean的完整生命周期(十一步骤)
- instantiate bean对象实例化
- populate properties 封装属性
- 如果Bean实现BeanNameAware 执行 setBeanName
- 如果Bean实现BeanFactoryAware 或者 ApplicationContextAware 设置工厂 setBeanFactory 或者上下文对象 setApplicationContext
- 如果存在类实现 BeanPostProcessor(后处理Bean) ,执行postProcessBeforeInitialization
- 如果Bean实现InitializingBean 执行 afterPropertiesSet
- 调用
<bean init-method="init">指定初始化方法 init - 如果存在类实现 BeanPostProcessor(处理Bean) ,执行postProcessAfterInitialization
- 执行业务处理
- 如果Bean实现 DisposableBean 执行 destroy
- 调用
指定销毁方法 customerDestroy
Spring 依赖注入
为Bean设置一个属性, 三种注入属性的方式
接口注入
1
2
3
4
5
6
7
8
public interface Injection{
    public void injectName(String name);
}
public class User implements Injection{
    public void injectName(String name){
        this.name = name;
    }
}
构造器注入
- setter 注入
Spring 只支持 构造器注入, 和 setter方法注入
构造器注入
1
2
3
4
5
6
7
8
9
10
<!--
public class Car {
    public Car(String name, double price){}
}
-->
<bean id="car" class="zhpooer.Car">
    <!-- 对象的第一个参数是Stirng -->
    <constructor-arg index="0" type="java.lang.String" value="保时捷"></constructor-arg>
    <constructor-arg index="1" type="double" value="1000"></constructor-arg>
</bean>
setter注入
1
2
3
4
5
6
7
8
9
10
11
12
13
14
15
16
17
18
19
<!--
public class Car{
    @BeanProperty public String name;
    @BeanProperty public String price;
}
public class Employee{
    @BeanProperty public String name;
    @BeanProperty public Car car;
}
-->
<!-- 使用 ref 属性, 可以注入复杂对象 -->
<bean id="car2" class="zhpooer.Car">
    <property name="name" value="宝马"></property>
    <property name="price" value="1000"></property>
</bean>
<bean id="emplayee" class="zhpooer.Employee">
    <property name="name" value="zhangsan"> </property>
    <property name="car" ref="car2"> </property>
</bean>
名称空间 p
Spring 2.5新特性, 简化属性注入
1 2 3 4 5 6 | <!-- p:<属性名>="xxx" 引入常量值 --> <!-- p:<属性名>-ref="xxx" 引用其它Bean对象 --> <bean xmlns:p="http://www.springframework.org/schema/p"> <bean id="car2" class="zhpooer.Car" p:name="宝马" p:price="1000"/> <bean id="employee" class="zhpooer.Emplayee" p:name="lisi" p:car2-ref="car2"/> </bean> |
spEL 表达式
完成对象之间注入
1
2
3
<property name="car2" ref="car2"></property>
<!-- 改为 -->
<property name="car2" value="#{car2}"></property>
应用其他对象属性
1
2
3
4
<bean id="carInfo" class="cn.itcast.spring.e_di.CarInfo"></bean>
<bean id="car2_2" class="cn.itcast.spring.e_di.Car2">
    <property name="name" value="#{carInfo.name}"></property>
</bean>
调用其他bean的方法
1
2
3
4
5
<bean id="carInfo" class="cn.itcast.spring.e_di.CarInfo"></bean>
<bean id="car2_2" class="cn.itcast.spring.e_di.Car2">
    <property name="name" value="#{carInfo.name}"></property>
	<property name="price" value="#{carInfo.caculatePrice()}"></property>
</bean>
集合属性的注入
1 2 3 4 5 6 7 8 9 10 11 12 13 14 15 16 17 18 19 20 21 22 23 24 25 26 27 28 29 30 31 32 33 34 35 36 37 | <!-- public class CollectionBean{ @BeanProperty private List<String> hobbies; @BeanProperty private Set<Integer> numbers; @BeanProperty private Map<String, String> map; @BeanProperty private Properties properties; } --> <bean id="collectionBean" class="zhpooer.CollectionBean"> <!-- List注入 --> <property name="hobbies"> <!-- 数组也是这么配置 --> <list> <!-- <ref></ref>, 表示引用 --> <value>学习</value> </list> </property> <!-- Set 注入 --> <property name="numbers"> <set> <value>10 </value> </set> </property> <!-- Map 注入 --> <property name="map"> <map> <entry key-ref=""/> </entry> <entry key="name" value="神"> </entry> </map> </property> <!-- Properties 注入 --> <property name="properties"> <props> <prop key="company"> 传智播客 </prop> </props> </property> </bean> |
多个XML配置文件
分开配置, 便于管理
并列引入多个XML
1
2
ApplicationContext context =
    new ClassPathXmlApplicationContext("bean1.xml", "bean2.xml");
引入总xml文件,在总xml文件引入 子xml文件, 常用
1
2
3
<!-- applicationContext.xml -->
<import resource="classpath:bean1.xml"/>
<import resource="classpath:bean2.xml"/>
注解配置 IoC
@Component 描述 Bean
1 2 3 4 5 6 7 | @Component("helloService") // <bean id="helloService" class="..."/> public class HelloService{ public void SayHello(){ println(""); } } |
applicationContext.xml
1 2 3 4 5 | <!-- 引入context描述文件 --> <beans xmln:context="http://www.springframework.org /schema/context"> <!-- 使Spring扫描到bean --> <context:component-scan base-package="io.zhpooer"></context:component-scan> </beans> |
spring2.5 引入@Component 等效三个衍生注解
@Repository用于对DAO实现类进行标注 (持久层)@Service用于对Service实现类进行标注 (业务层)@Controller用于对Controller实现类进行标注 (表现层)
属性依赖注入
- 简单属性注入
1
2
3
4
5
6
7
8
9
10
11
12
13
14
15
16
17
18
19
20
21
22
23
@Service("userService")
public class UserService{
    // 1. 简单属性注入, set 方法都可以不用
    @Value("itcast")
    private String name;

    // 2. 复杂属性注入, 根据类型自动注入
    @Autowired
    private UserDao userDao;

    // 3. 复杂属性注入, 结合 Qualifier, 根据名字注入
    @Autowired(required=false)  // required默认true, 若注册不成功,或报错
    @Qualifier("userDao")
    private UserDao userDao;

    // 4. @Resource和@Autowired注解功能相似, 是JSR标准
    @Resource(name="userDAO")
	private UserDAO userDAO ;
}
@Repository("userDao")
public class UserDao{
   public void saveUser();
}
@Value @Autowired 注解都可以修饰 成员变量 或者 setter方法,
如果修改成员变量,不需要提供setter方法
初始化销毁
指定Bean的初始化方法和销毁方法(注解)
<bean init-method="" destroy-method="" />
@PostConstruct作用 init-method@PreDestroy作用 destroy-method
1 2 3 4 | public class LifeCycleBean{ @PostConstruct public void init(){} @PreDestroy public void destroy(){} } |
Bean作用范围
Bean的作用范围 <bean scope="" />
@Scope注解 ,默认作用域 singleton 单例
1 2 3 | @Service @Scope("prototype") public class ScopeBean{} |
Spring3.0 的注解
JavaConfig: 以一个Java类做配置文件
@Configuration指定POJO类为Spring提供Bean定义信息@Bean提供一个Bean定义信息
1 2 3 4 5 6 7 8 9 10 11 12 13 14 15 16 17 18 19 20 21 22 23 24 25 26 27 | public class Car { private String name; private double price; } public class Product { private String pname; private int pnum; } // 配置Bean, (工厂) // 获得两个Bean, 相当于获取配置文件声明两个Bean @Configuration public class BeanConfig { @Bean(name="car") public Car initCar(){ Car car = new Car(); car.setName("大宗"); return car; } @Bean(name="product") public Product showProduct(){ Product p = new Product(); return p; } } // 配置自动扫描, 让文件被扫描到 |
xml和注解混合使用
很多企业开发者 还是采用 xml作为主流配置
- Bean 注册 通过XML完成
- 注入使用 @Autowired 注解完成
1 2 3 4 5 6 7 8 9 10 | public class CustomerDao {} public class OrderDao {} public class CustomerService { @Autowired private CustomerDao cDao; @Autowired private OderDap oDao; } |
1 2 3 4 5 6 7 8 | <beans> <bean id="customerDao" class="zhpooer.CustomerDao"> </bean> <bean id="orderDao" class="zhpooer.OrderDao"> </bean> <bean id="customerSerivce" class="zhpooer.CustomerService"> </bean> <!-- 启用四个注解 --> <!-- @Resource、@ PostConstruct、@ PreDestroy、@Autowired --> <context:annotation-config/> </beans> |
结论
- xml配置 和 注解配置 效果完全相同
- 如果Bean 来自第三方, 必须使用xml
- Spring3.0 Bean注册方式, 使用比较少, 主要用于Bean 构造逻辑及其复杂
web spring 整合开发
直接在Servlet 加载Spring 配置文件
1 2 3 | ApplicationContext applicationContext = new ClassPathXmlApplicationContext("applicationContext.xml"); HelloService helloService = (HelloService) applicationContext.getBean("helloService"); helloService.sayHello(); |
每次请求都会加载Spring环境,初始化所有Bean ,性能问题 !!!
- 解决方案一 : 将代码放入Servlet init 中 , 无法保证所有Servlet都能使用 ApplicationContext
- 解决方案二 : ServletContext, tomcat启动时, 加载Spring配置文件,获得对象 ,放入ServletContext
- 导入spring-web.jar
配置web.xml
1
2
3
4
5
 <!-- 保存 ContextLoaderListener 完成在Servlet初始化阶段,
      加载Spring配置文件,将工厂对象放入 ServletContext -->
<listener>
    <listener-class>org.springframework.web.context.ContextLoaderListener</listener-class>
</listener>
默认读取 WEB-INF/applicationContext.xml
1
2
3
4
5
<!-- 配置 全局参数 contextConfigLocation 指定 配置文件位置 -->
<context-param>
    <param-name>contextConfigLocation</param-name>
	<param-value>classpath:applicationContext.xml</param-value>
</context-param>
在servlet中获取 Spring 容器
1
2
3
4
5
6
// 方式一:
WebApplicationContext applicationContext =
    getServletContext().getAttribute(WebApplicationContext.ROOT_WEB_APPLICATION_CONTEXT_ATTRIBUTE);
// 方式二:
WebApplicationContext applicationContext =
    WebApplicationContextUtils.getWebApplicationContext(getServletContext());
整合Junit
导入 spring-test.jar
1 2 3 4 5 6 7 | @RunWith(SpringJUnit4ClassRunner.class) // 指定配置文件位置 @ContextConfiguration(locations="classpath:applicationContext.xml") public class HelloServiceTest{ @Autowired private HelloService helloService; // 注入需要测试对象 } |